
Would you trust yourself to drill a large hole through the floor of your custom camper or marine hull without a second thought? For most owners, the transition to a true four-season vehicle involves a fair amount of technical anxiety. It's completely normal to feel hesitant when you're facing fuel line taps, complex exhaust routing, and the critical requirements for carbon monoxide safety. This Airtronic heater installation guide provides the professional-grade insights you need to move past that hesitation and master the intricacies of your setup.
We understand that you want more than just a heat source; you want the peace of mind that comes from a reliable, integrated climate system. We'll preview the essential steps to ensure your Airtronic S3 or M3 unit is installed with precision, focusing on long-term efficiency and safety. From mounting the heater to configuring the MCS7 Controller for advanced management, this overview will give you the confidence to complete a professional-looking installation that stands up to the most demanding environments. We'll guide you through the process of creating a warm, safe cabin for your travels, ensuring every component is integrated correctly with your vehicle power.
Key Takeaways
- Learn how to identify the ideal mounting location that balances airflow requirements with necessary safety clearances for combustible materials.
- This Airtronic heater installation guide details how to use templates for precision drilling and install fuel pumps at the specific angles needed to prevent air bubbles.
- Discover why sizing power cables correctly prevents voltage drops and how integrating the MCS7 Controller Kit provides a more intuitive user experience.
- Understand what to expect during the initial startup, including the essential 20-minute burn-off period required to clear manufacturing oils safely.
- Gain the confidence to move beyond a basic setup to a professional, four-season heating system that ensures long-term reliability in extreme conditions.
What is an Airtronic Heater and Why Professional Setup Matters
An Airtronic heater is more than just a luxury for a cold night; it's a compact, diesel-powered forced-air furnace engineered for high-stakes off-grid efficiency. While many see it as a simple box that blows hot air, it's actually a sophisticated piece of German engineering from Eberspächer, the manufacturer of Airtronic. It works by pulling fuel directly from your vehicle's tank, mixing it with external air in a sealed combustion chamber, and transferring that heat into your cabin through a high-efficiency heat exchanger. This process provides dry, consistent warmth without the moisture issues common with propane heaters.
The difference between a basic install and a truly reliable system is what separates a comfortable winter trip from a frustrating mechanical failure. A professional setup isn't just about making the unit turn on. It involves precise fuel line routing, vibration-dampening mounts, and airtight exhaust seals that prevent carbon monoxide from entering your living space. We focus on Airtronic Heater Kits because they provide the durability needed for the constant movement and environmental stress of van life and marine travel. When you're miles from the nearest paved road, the quality of your installation becomes your primary safety net.
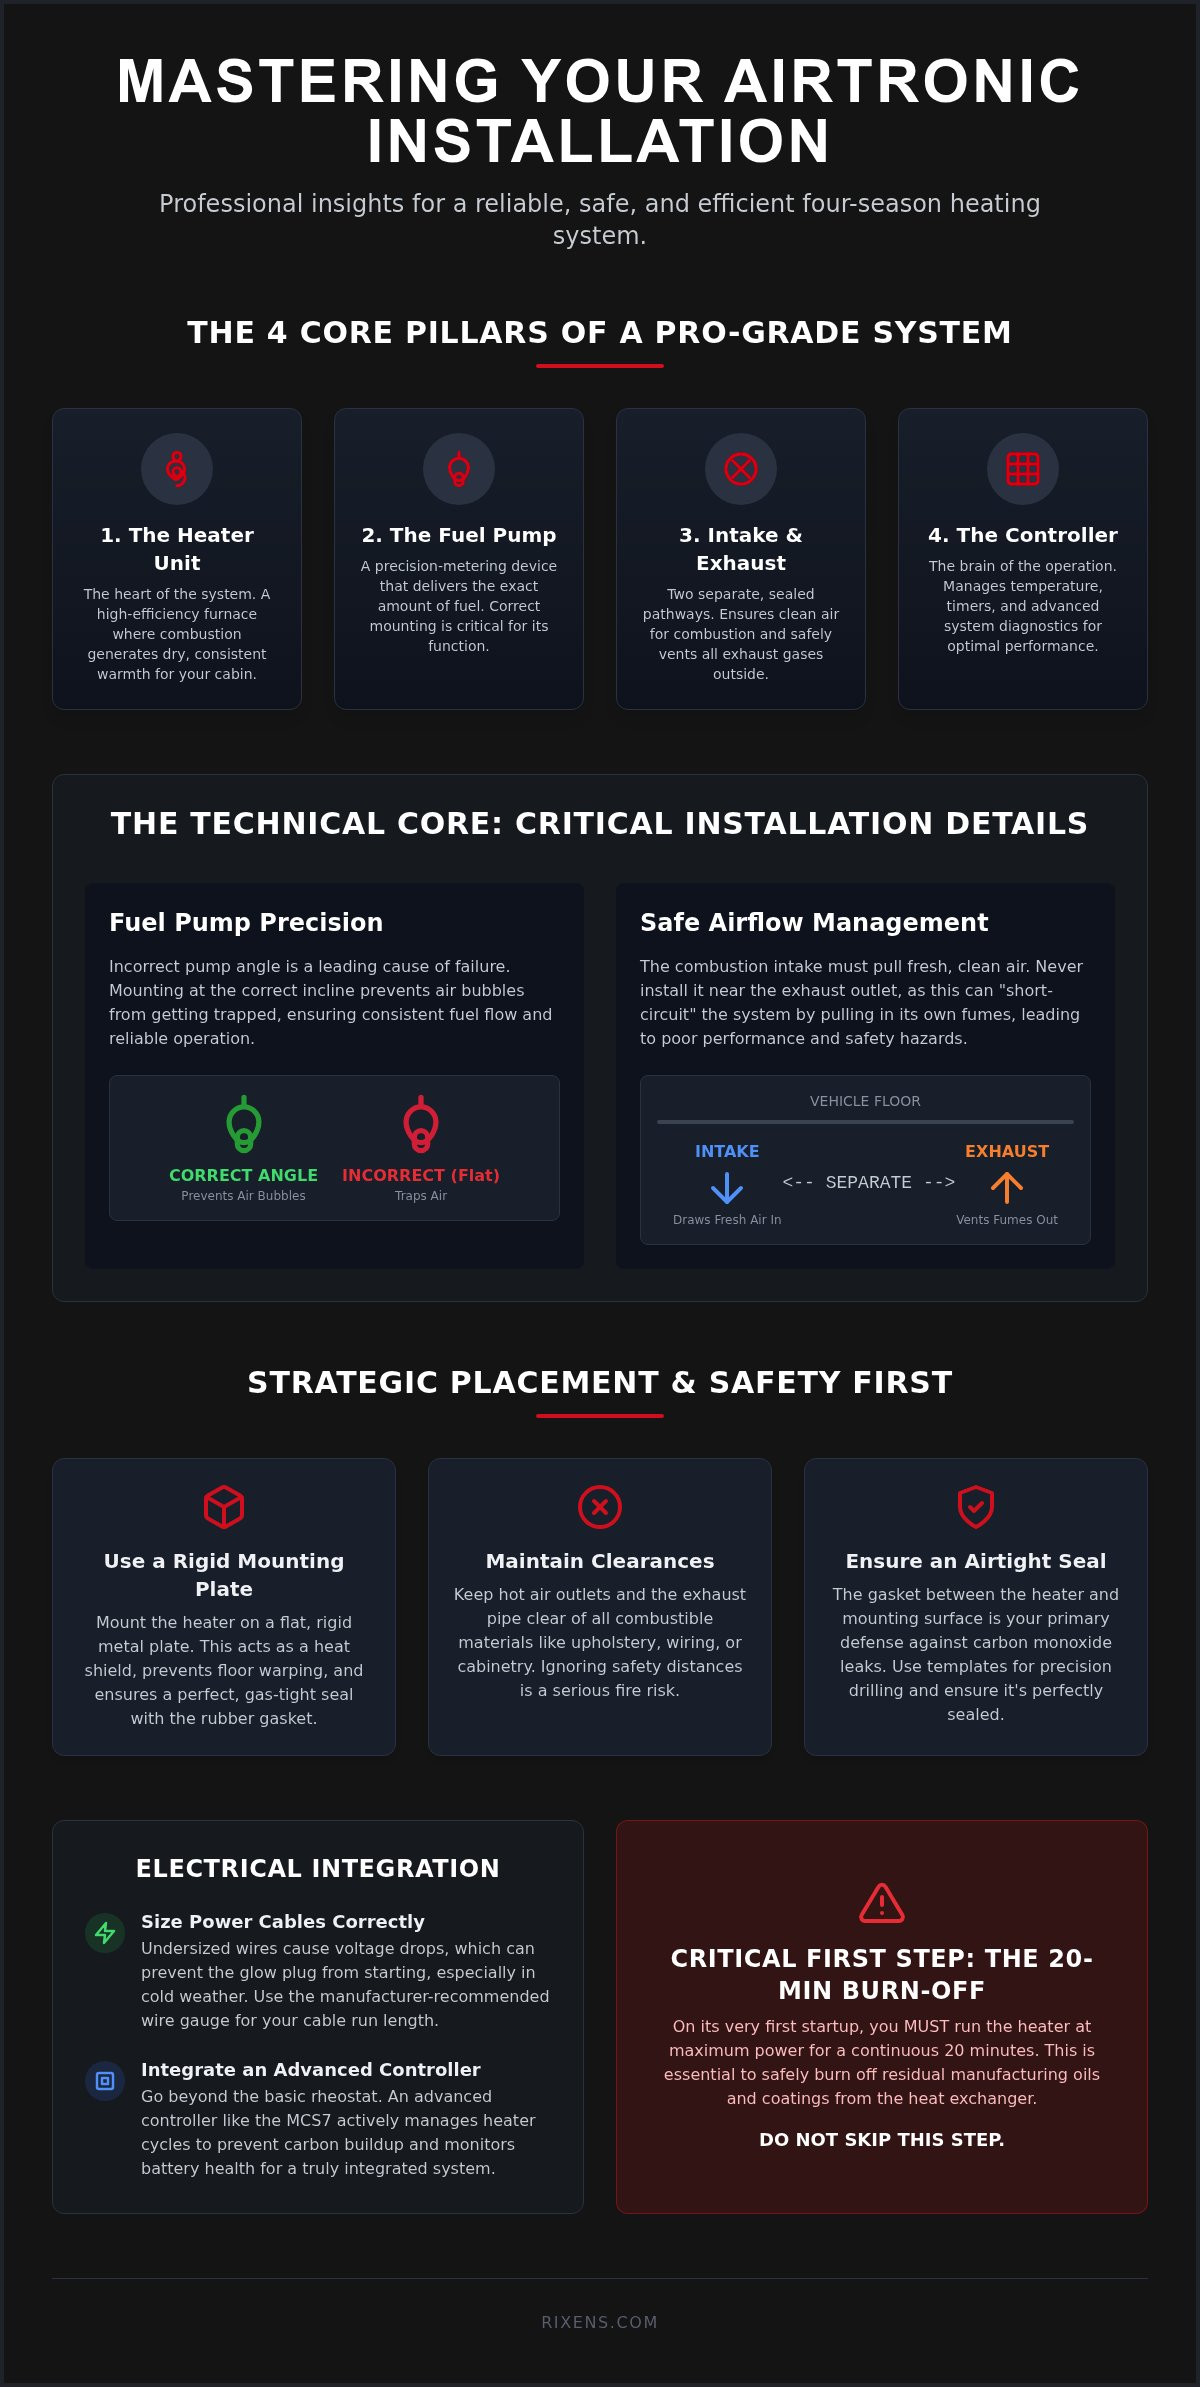
A complete system relies on four core pillars:
- The Heater Unit: The heart of the system where combustion occurs and heat is exchanged.
- The Fuel Pump: A precision-metering device that must be mounted at a specific angle to function.
- Intake and Exhaust: Separate pathways that ensure the heater breathes clean air and vents safely outside the vehicle.
- The Control Interface: The brain that manages temperatures, timers, and system diagnostics.
Using a comprehensive Airtronic heater installation guide ensures you don't overlook the small details, like the specific torque for mounting bolts or the exact distance required between the intake and exhaust ports to prevent "short-circuiting" the air supply. These nuances dictate whether your heater lasts for a few seasons or for the entire life of your vehicle.
Diesel vs. Gasoline Airtronic Models
Choosing the right model starts with your vehicle's primary fuel source. Most heavy-duty builds rely on diesel because of its higher energy density and safety in storage. However, gasoline models are essential for many modern petrol-powered vans. While both offer exceptional performance, diesel units typically handle extreme cold better, as gasoline can be more volatile at high temperatures. The Airtronic S2/M2 series remains the current 2026 standard for efficiency, offering refined brushless motors and quiet fuel pumps.
The Rixen's Advantage: Beyond the Box
A standard kit is a great starting point, but true comfort requires smart integration. We believe the missing link in most setups is how the heater communicates with the rest of your vehicle. Our Airtronic heater installation guide emphasizes the role of the MCS7 Controller Kit. This proprietary controller doesn't just turn the heat on; it manages heater cycles to prevent carbon buildup and monitors battery health to ensure your glow plug doesn't drain your power bank. It's about turning a standalone heater into a fully integrated climate control system that supports your van life journey without the stress of manual monitoring.
Strategic Placement: Where to Mount Your Airtronic Heater
Selecting the right location for your heater is a decision that dictates both the safety and longevity of your system. It isn't merely about finding an empty corner; it's about balancing airflow requirements, maintenance access, and proximity to fuel and electrical sources. A critical part of any Airtronic heater installation guide is ensuring the unit sits on a flat, rigid mounting plate. This plate acts as a heat shield to prevent floor warping and provides a perfectly level surface for the rubber gasket to seal against. Without this seal, you risk exhaust gases entering the cabin.
Safety should be your primary driver when choosing a spot. You must maintain clear distances between the hot air outlet and any combustible materials, like cabinetry or upholstery. These systems generate significant heat at the outlet, and ignoring these clearances can lead to scorched surfaces or worse. When planning your layout, it helps to follow established federal safety principles for heating systems, which emphasize the separation of combustion components from living spaces. In marine environments, we strongly recommend mounting heaters in dedicated lockers rather than engine compartments to avoid the risk of drawing in fuel vapors or oily smells.
If you're still weighing the pros and cons of different layouts, our team at Rixen's can help you select the right Airtronic Heater Kits for your specific vehicle dimensions.
Common Van Mounting Locations
The passenger seat base is a favorite for Sprinter and Transit owners because it's centrally located and keeps the unit protected. However, it can be a tight fit that makes future servicing difficult. Alternatively, placing the heater in a rear garage area offers more room for maintenance but requires longer ducting runs that can reduce heat efficiency. Some builders opt for external mounting in a weather-resistant enclosure. This saves valuable interior floor space but exposes the unit to road salt and debris, making a high-quality protective box mandatory.
Optimizing Air Intake and Distribution
Your heater needs to breathe. The internal blower motor requires a constant supply of cabin air to move across the heat exchanger. This Airtronic heater installation guide recommends keeping ducting runs as straight as possible. Sharp 90-degree bends create static pressure, which forces the heater to work harder and can eventually cause the unit to shut down from overheating. We often get asked about recirculating air versus drawing in fresh air. While recirculating cabin air is more energy-efficient, drawing in a small amount of fresh outside air can significantly reduce interior condensation during the winter months.
The Technical Core: Fuel, Exhaust, and Combustion Air
Drilling through your vehicle's metal skin is often the most stressful part of the process. To execute this with confidence, always use the metal mounting template included in your kit. This template ensures that the holes for the combustion air intake, the exhaust pipe, and the fuel line are perfectly spaced. Misalignment here can lead to pinched lines or, worse, a compromised seal that allows gases to leak into the cabin. This Airtronic heater installation guide emphasizes that a clean cut followed by a thorough application of rust-preventative paint on the exposed metal is a non-negotiable step for long-term durability.
Precision continues with the fuel pump installation. Unlike a standard water pump, the fuel metering pump for an Airtronic unit must be mounted at a specific upward angle, typically between 15 and 35 degrees. This orientation allows any air bubbles trapped in the fuel line to pass through the pump rather than causing a flame-out or lockout. We also need to consider the combustion air intake, which acts as the 'lung' of your heater. It should be routed to a protected area under the vehicle where it won't ingest road spray or debris, ensuring the internal combustion process remains efficient and clean.
Fuel Tapping Methods
There are two primary ways to source fuel: a dedicated standpipe or an auxiliary fuel port. Modern vans like the Sprinter or Transit often have an auxiliary port on the fuel sender unit, making the process much simpler. If your vehicle lacks this, you'll need to install a standpipe directly into the tank. Regardless of the method, you must use the specific small-diameter fuel line provided in the kit. The inner diameter is critical for maintaining the correct fuel pressure. Never attempt to 'T' into your vehicle's high-pressure fuel lines; the heater's pump isn't designed for that pressure, and you risk damaging both the heater and your engine's fuel system.
Exhaust Safety and Silence
Exhaust routing is where safety meets comfort. You must route the pipe so that it terminates past the edge of the vehicle body to prevent carbon monoxide from pooling underneath. When installing the exhaust, it's vital to stay compliant with emissions standards for fuel-fired heaters to ensure your setup is both legal and environmentally responsible. Use high-temp exhaust paste at every connection to create a gas-tight seal, and always install the exhaust silencer if you value a quiet night's sleep. Ensure the exhaust exit is pointed away from the combustion air intake to prevent the heater from 'choking' on its own fumes. Following these steps in your Airtronic heater installation guide will result in a system that is as quiet as it is safe.
Electrical Integration and the MCS7 Controller
An Airtronic heater installation guide must prioritize the electrical backbone of your system to ensure long-term reliability. Many users focus heavily on the mechanical mounting but overlook the fact that these heaters are sensitive electronic devices. The most critical phase of operation is the 'Start-up Surge.' During the first five minutes, the internal glow plug requires a significant amount of current to ignite the diesel or gasoline. If your wiring isn't up to the task, the resulting voltage drop will trigger a safety lockout before the heater even begins to produce warmth. Following a professional Airtronic heater installation guide ensures your wiring is sized correctly to handle this initial demand without compromise.
To prevent these failures, you should always connect your heater to your house battery bank rather than the vehicle's starter battery. House batteries, particularly lithium or AGM types, are designed for the deep cycles and steady discharge that a heater requires during a long winter night. We recommend using high-quality, marine-grade power cables. Sizing these cables is not just about the total amperage; it's about the length of the run from the battery to the unit. Even a small amount of resistance in a long, undersized wire can cause the system to fail during the glow-plug phase.
If you want to move beyond a basic setup, integrating the MCS7 Controller Kit transforms how you interact with your climate system.
Advanced Control with the MCS7
The MCS7 Controller Kit replaces standard, simplified interfaces with a comprehensive management tool. It provides precise temperature sensing and allows you to program cycles that match your travel rhythm. One of the greatest benefits of digital control is the clarity it brings to troubleshooting. Instead of deciphering blinking light patterns, the MCS7 displays clear error codes that tell you exactly what the system needs. For those looking for deeper technical specs on system management, you can explore our guide on Mastering Comfort: The MCS7 Controller Kit Guide.
High Altitude and Sensor Integration
Modern units like the Airtronic S2 are designed to handle altitude changes automatically, but the controller is what allows you to monitor that performance in real-time. For the most accurate climate control, you should place the external temperature sensor at shoulder height in the main living area, away from direct sunlight or the heater's own hot air outlet. Proper sensor placement prevents the unit from cycling on and off too frequently. The MCS7 prevents 'sooting' by managing run times effectively, ensuring the heater reaches a high enough temperature to burn off carbon deposits before it shuts down. This methodical approach to electrical integration ensures your heater remains a steady, dependable partner for years to come.
Commissioning, Testing, and Long-Term Maintenance
The physical mounting and wiring are complete, but your journey with this Airtronic heater installation guide isn't over until the system is successfully commissioned. The first start-up is often the most nerve-wracking moment for any builder. It's important to stay calm if the unit doesn't ignite on the first try. The fuel pump must prime the entire length of the line, which can take several start cycles. You might see a puff of white smoke or notice a distinct "new heater" smell. This is simply the manufacturing oils clearing from the heat exchanger and is no cause for alarm.
Once the heater successfully ignites and begins to produce steady warmth, you must perform a 20-minute burn-off. Running the unit on its highest setting for this duration ensures that all internal components reach their optimal operating temperature and any residual contaminants are purged. This initial high-heat cycle is essential for setting the stage for clean combustion. We recommend keeping your windows open during this process to allow the manufacturing odors to dissipate quickly.
Reliability is a long-term commitment. One of the most common mistakes owners make is letting their heater sit idle all summer. Diesel fuel can gel or develop microbial growth over time, and internal components can seize without use. We suggest running your heater for at least 15 to 20 minutes once every month, regardless of the outside temperature. This simple habit keeps the fuel fresh in the lines and ensures the internal fan and pump remain lubricated and ready for the first frost.
The Commissioning Checklist
Before you consider the job finished, walk through these final safety and performance checks. Verification at this stage prevents small oversights from becoming major headaches in the middle of a trip.
- Fuel Line Integrity: Inspect the clear sections of your fuel line for large air bubbles. A few tiny bubbles are normal, but gaps will cause the heater to flame out.
- Exhaust Gas Safety: Use a handheld carbon monoxide (CO) detector around the heater's base and exhaust exit. There should be zero CO leakage inside the cabin.
- Fan Clearance: Ensure the internal blower fan spins freely. Sometimes, over-tightening the mounting bolts or ducting can slightly deform the case, causing a rubbing sound.
Ensuring Long-Term Performance
An annual inspection is the best way to honor the effort you put into your installation. Every year, usually before the winter season begins, you should inspect the glow pin and its surrounding screen. If these become "sooted up," the heater will struggle to start. Additionally, don't forget to clean the small fuel filter located at the inlet of the metering pump. This tiny screen is often overlooked in basic guides but is the primary defense against contaminated fuel. If you ever notice a significant drop in heat output or a change in the sound of the combustion, it's time to call the experts at Rixen's to discuss potential carbon buildup or pump wear.
To ensure you have everything needed for a successful build and ongoing care, you can explore our full range of Airtronic Heater Kits and replacement parts. We are here to support your journey from the first hole you drill to the many years of warmth that follow.
Mastering Your Off-Grid Cabin Climate
Mastering your off-grid heating is about more than just surviving the winter; it's about creating a dependable environment for your adventures. By following this Airtronic heater installation guide, you've learned that success lies in the details. Precise mounting, airtight exhaust routing, and the integration of advanced digital management are what separate a temporary fix from a professional-grade setup that lasts for decades.
We're committed to your success long after the first ignition. With over 40 years of heating expertise and a deep focus on precision-engineered MCS7 control solutions, we ensure every kit we sell is backed by professional support. You don't have to navigate these technical decisions alone. Whether you're drilling your first hole or fine-tuning your temperature sensors, we're here as your steady partner in specialized climate control. Our team is dedicated to ensuring your system remains efficient and safe through every season.
Build your ultimate off-grid heating system with Rixen's expert kits and gain the peace of mind that comes from a system built for endurance. Your next four-season journey starts with a warm, safe cabin.
Frequently Asked Questions
Is it safe to run an Airtronic heater while sleeping?
Yes, it's safe to run your heater overnight because the combustion process is completely sealed from the cabin air. The unit draws air for combustion from outside and vents exhaust gases back outside, only transferring heat through a metal exchanger. We always recommend installing a high-quality carbon monoxide detector as a standard safety precaution in any mobile build to ensure total peace of mind while you rest.
Can I install an Airtronic heater myself, or do I need a professional?
You can install an Airtronic heater yourself if you have mechanical confidence and follow a detailed Airtronic heater installation guide. However, working with fuel lines and drilling through vehicle floors requires precision and a methodical approach. We provide professional support with every kit we sell to bridge the gap between a DIY project and a reliable, expert-grade installation that ensures long-term performance. For those who require this same level of professional mastery for residential or commercial properties, you can discover E.R.S. Heating & Cooling for specialized HVAC solutions.
How much power does an Airtronic heater consume from my battery?
An Airtronic heater typically consumes between 8 and 40 watts during normal operation, depending on the heat setting. The most significant draw occurs during the first few minutes of start-up, when the glow plug requires approximately 8 to 10 amps to ignite the fuel. Once the flame is established, the power consumption drops significantly, making it an exceptionally efficient choice for overnight use on house battery banks.
What is the difference between an Airtronic and a Hydronic heater?
The primary difference is the medium used to transfer heat throughout your vehicle. An Airtronic heater is a forced-air system that warms the cabin air directly for immediate comfort. In contrast, a hydronic system like the MCS One heats a coolant mixture. This liquid can then be used to provide domestic hot water and engine pre-heating through various heat exchangers, offering a more comprehensive utility setup.
Does the Airtronic heater require a dedicated fuel tank?
No, a dedicated fuel tank isn't required because the heater can tap directly into your vehicle's existing diesel or gasoline tank. Most modern vans have an auxiliary port on the fuel sender specifically for this purpose. If your vehicle lacks this port, you can install a standpipe directly into the tank. Using the main tank ensures you only have one fuel source to monitor during your travels.
How do I troubleshoot an 'F' error code on my controller?
Troubleshooting an 'F' error code begins with identifying the specific two-digit number displayed on your controller. These codes typically point to issues like low voltage, fuel starvation, or an interrupted flame. If you use the MCS7 Controller Kit, these errors are displayed clearly. This allows you to quickly diagnose whether the system needs a battery charge or a fuel line prime without any frustrating guesswork.
How often should I service my Airtronic heater to ensure reliability?
You should run your heater for at least 20 minutes once a month throughout the year to prevent fuel gel and component seizure. A more thorough annual inspection is recommended before the winter season starts. This service should include checking the glow pin screen for carbon buildup and cleaning the fuel pump filter to maintain the high-performance standards outlined in your Airtronic heater installation guide.
Can I use an Airtronic heater at high altitudes above 9,000 feet?
Yes, the current Airtronic S3 and M3 models feature integrated altitude sensors that automatically adjust the fuel-to-air ratio for operation up to 18,000 feet. This eliminates the need for manual high-altitude kits used in older generations. The system continuously monitors atmospheric pressure to ensure clean combustion, preventing the carbon buildup that often plagues standard heaters when operating in thin mountain air.
